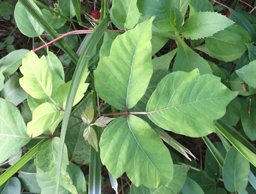
Time outdoors is time well spent for children and adults alike. This post is an update of one from last summer because it's important to know what to watch out for especially if you don't spend a lot of time out in nature. Today’s blog will focus on introducing children to the concept of hazards. If you and your child are already used to spending a lot of time in nature you may want to skip to the bottom of the post for some good links!
First take a little time to think about what you and your child will wear and bring along clothing wise. You do that every day, but some people are afraid of weather changes. As the Swedes say, “There is no such thing as bad weather, just bad clothing.” Obviously a day of thunderstorms or extreme heat or cold, is not the time to be exploring outside, but don’t rule out a day with rain showers. Those days can be the most fun and interesting. If that is not your thing – you may want to give it a try. For hikes bring a sunhat, bug repellant, and shoes that can get wet, and my favorite at any time of year…an old towel. A towel is one of the most basic and useful items to bring along (that’s for you fans of The Hitchhiker’s Guide to the Galaxy, but it’s also true). A towel is right up there with water and a snack.
The goal is for your child (and you) to learn what is safe and what is not and to feel confident in exploring outside. Start by teaching your child to identify possible hazards in your area from plants and animals to slippery or steep paths. If you are not used to hiking outside, start with easily accessible paths and work your way up to bigger hikes. This is especially important for small children; you don’t have to go far into the woods for them to have a great time exploring. It’s about observation and taking your time to see everything around you, not miles logged.
Teach your child to look out for hazards. Many outdoor programs will tell you that the first thing to do is to stop, point to it and say “Hazard on the trail” or whatever you decide to say. It sounds a little stilted, but this way everyone is aware and notices what to avoid. Everyone can look, discuss, and decide if it’s a hazard or not. Noted environmental teacher in the Washington D.C. area, Amy Beam, teaches children to identify hazards on their first day out in the woods. She gives them a song to sing whenever they see something they suspect is a hazard, from snakes and poison ivy to rocks or ice on the path.
Here are a few things to learn about and teach your child so your child will feel confident outside. This is a basic list and certainly not complete especially since every area has it’s own hazards.
Know the dangerous plants in your area and teach children to stay clear them. Examples:
Poison Ivy
Poison Oak
Poison Sumac
Know the dangerous animals and insects in your area. Examples:
Snakes – copperhead, cottonmouth, rattle
Black widow spider
Ticks (have a tick key for easy removal) http://www.tickkey.com
You can buy a field guide, or you can print out pictures from your online search.
For very young children, explain that we never put plants in our mouths, unless you know your plants and are teaching which plants are edible. Here is a list of ones to never eat…
https://www.backpacker.com/skills/12-deadly-plants-you-should-never-eat
Peterson Guides are wonderful. I also like Pocket Naturalist Guides. They are small laminated flyers that cover the most common North American trees, plants, animal, etc. The small guides are great for hiking and identifying animals and plants. They even cover wilderness survival. The guides are fairly easy and fun for young children to use with your help. They can be found at...
http://www.waterfordpress.com/products/pocket-naturalist-guides.html
Our world is full of resources so use them from Google to talking to park rangers on what to look out for in that area. A little preparation can help everyone to feel competent and prepared to enjoy the great outdoors.


